More Black Belt Stitching Wizard Stuff

Monday, August 08, 2011

Ort Box Tutorial


Some time ago I shared with you pictures of ort boxes I had made to give to my stitchy friends.  Many of you asked via my comments where you could find the instructions.  They were given to me by my good stitchy friend Kathy who also talked me through making my first one.  Since I've finally got the time I thought I'd put together a step-by-step photo tutorial for you.  If a step seems unclear please don't hesitate to contact me and I'll make the adjustments to these instructions as soon as possible.

Supplies needed: Wallpaper border or wallpaper, ruler, scissors, pencil and glue stick
 Cut a piece of wallpaper border 10 inches long

 Cut your 10 inch piece 6 inches wide, you should now have a piece 10 inches by 6 inches

 With your pencil mark horizontal and vertical lines every two inches on the good side of the paper

 Wallpaper border marked with 2 inch by 2 inch squares

Fold along horizontal lines

Fold along vertical lines

DO NOT MARK YOUR PAPER THIS IS JUST TO SHOW WHERE TO CUT!!!
Cut slits along bottom where indicated by dark black lines.  Cut slits on right hand side where indicated by dark lines.  Cut out 2 inch by 2 inch square in top right hand corner marked "cut out".  Consider where this square is cut out the "top" of the paper.

This is how your paper should appear after slits have been cut and corner has been cut out

DO NOT MARK YOUR PAPER AS SHOWN HERE THIS IS MERELY A GUIDE TO SHOW YOU
Fold your paper diagonally corner to corner of each of the 2 inch by 2 inch boxes you drew on the paper in one direction as show (top two rows only not the bottom flaps)

DO NOT MARK YOUR PAPER AS SHOWN HERE THIS IS MERELY A GUIDE TO SHOW YOU
Fold your paper diagonally corner to corner of each of the 2 inch by 2 inch boxes you drew on the paper in the opposite direction (top two rows only not the bottom flaps)

Your paper should look like this after you've done all of the diagonal folds each 2 inch by 2 inch box should have an "X" inside it

You're now ready to start constructing the box.  At this point top and bottom become very important.

 Fold the bottom right hand corner back

Glue it to the flap it folds behind

Just to be obvious ;-)

Your piece should look like this from behind when flap is glued down this will be the inside bottom of your box

Flip your paper back over it should now look like this

Fold the top row over so that the wrong sides are touching

The back should look like this

The flap on the far right hand side, it is the tab you will tuck in to make the box

Fold to fashion a square/box

Tuck the tab in between the two layers of paper

Tucking tab in between two layers of paper

Sometimes the tab doesn't fit in evenly/snugly this is why I don't glue it right away

If necessary trim a little off of the tab

Tab now fits in nicely

 Unfold your box and on the back side put glue in the top right hand box and the one below it, this will secure the tab and keep the box together when you re-fold your box.

Re-fold your box, inserting the tab where you put glue, put a little pressure with your fingers on the area where you slid in the tab to make it stick!

 Locate the one flap on the bottom that has the good side of the paper on both sides (the other three will be one side only, you glued this earlier on)
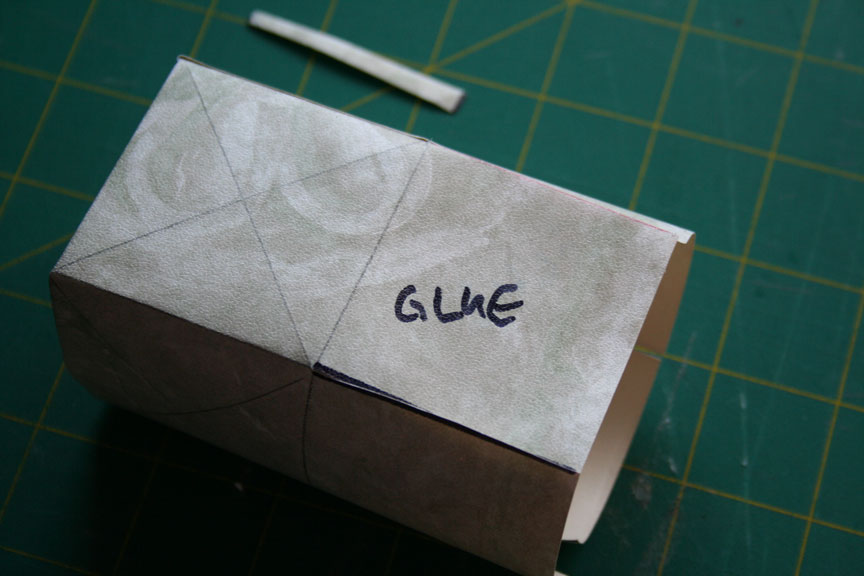
 Put glue on the outside of the flap you just located (that has the wallpaper pattern on both sides)

 Fold down the double sided flap you just put glue on

 Fold a flap on top of the glued, double sided flap.  Apply pressure with your fingers to make sure it gets glued down

Now put glue on top of the flap you just folded down

Fold another flap down on top of the glue

 Glue the flap you just folded down, again use your fingers to put pressure so it sticks

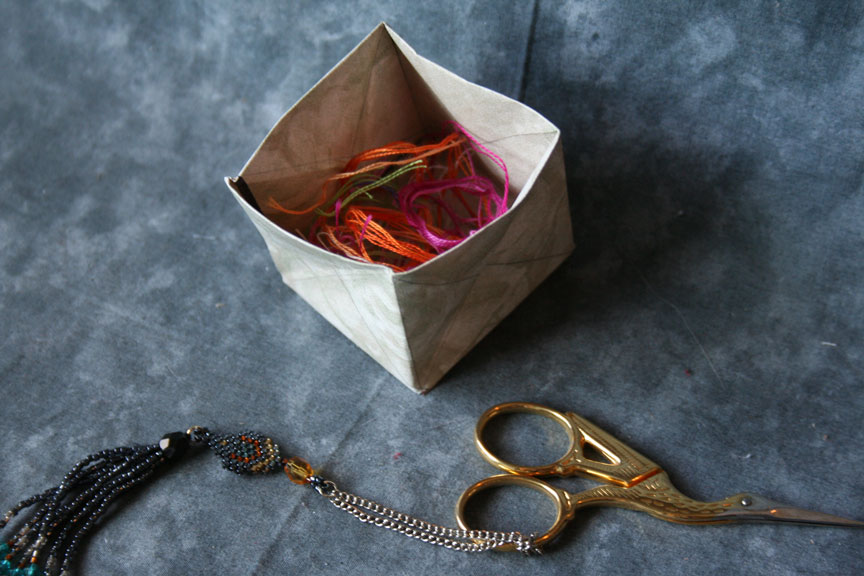
Fold the last flap down, and use your fingers to put pressure so it all sticks together!  Look, its a box!

 Turn your box right-side up

The diagonal lines you folded earlier will aid in collapsing the ort box.  The first time your box may need a little persuading/forcing to collapse.

 There you go, a collapsed ort box, from now on it'll be a lot easier to collapse its just the first time that's tricky!

Congratulations!  You've done it, you've made a collapsible ort box!

Teddy Happy Dance & PhotoHunt

We all reach a time in our lives when our friends start having babies.  In the last few months two of my close friends have had their first children.  I'm stitching up this quick, cute little JBW design twice and framing them as little baby samplers.  Here's the first of two, this one for a girl!

French Country - Teddy Bear
c2011 JBW Designs
Stitched on : 28ct Light Mauve Quaker
Stitched with: DMC B5200

I'm almost caught up with PhotoHunts for 2011, soon I'll move back in time to the themes from 2010 and then I'll be 100% up to date!  The them on July 9th was "near".


This photo was from my Dominican Experience in February of this year.  One of our days was spent in the mountains of Hato Mayor where we learnt about cocoa plants and how they're cultivated.  We were introduced to Mondesto a cocoa tree farmer.  He wanted us to all come in closely, once we were near he wanted us to see his hand, where earlier that day he drew a picture of Jesus in pen.  He said he loved Jesus so much he was inspired to draw his likeness on his hand that morning.  Mondesto was quite a character and it was obvious he took joy in our visit and sharing his knowledge with us.

Stay tuned for my next blog entry... its the long awaited ort box tutorial!

Saturday, August 06, 2011

Stitchy Gift Received & Photo Hunt

Back in March I had a giveaway on my blog, well two actually.  It was to celebrate my Birthday and 1,501st post.  I'm waiting for the second gift to arrive, its got a long way to go but one of the two has made it to its destination.

From my Arizona Adventures: Annette on the left, me and Bette on the right

Bette, who I had the joy to meet in Arizona back in March (honestly, the random number generator picked her it was fate!).  Bette and I have also been reading each others blogs for years so it was so nice to meet!

Eat, Sleep, Stitch, Live Life Simply
c2010 Cherrywood Studios
Stitched on 28ct African Daisy Joblean
Stitched With DMC

Its Saturday, so its PhotoHunt Time!  This week's theme is : Painted


One day back in the spring when I arrived at the Dojang to teach Taekwon-Do that evening I spotted this uniquely painted car in the strip mall's parking lot!  I've never seen this car again!

A Trip Downtown

The Rideau Canal running through the heart of Downtown Ottawa, it becomes the world's longest outdoor skating rink in winter

The Chateau Laurier, somewhere I could never afford to stay!

I think no matter where we live we kinda have this mental boundary line where we consider a little further than we want to/prefer to go in our area.  For me my mental boundary is Downtown Ottawa, I'll go there if I have to, rather not, and its got to be a good reason for me to go further East than Downtown.  On Thursday I had a very good reason to go downtown!
National Arts Center on the banks of the Rideau Canal

I went to the NAC, National Arts Center to see the Broadway Across Canada production of Lion King.  The seats were fantastic and the show was even better!  Actually I would say it was utterly amazing!  The costumes the sets, the make-up and the perofrmers were wonderful.  The opening sequence just gave me chills!  It was just amazing how the performers emulated the movement/behaviours of the animals they were portraying.  I've seen a few shows in my time (Phantom several times, Les Miserables, Cats, and Tommy) and I have to say its up there amongst my favourites!


I wish more productions would come to the NAC, but from what I've heard the stage is too small for some of the sets/productions.  Which is such a shame!

Wednesday, August 03, 2011

August Stitching Goals and a Few More Freebies

As you can see from my posts, so far my summer holidays have been quite busy, so I haven't gotten near as much stitching done as I had thought I would.  But then who would rather be cooped up in the house on their own when they can go have adventures with good friends?  So far I think today is going to be a quiet one... but then one phone call or text message could change that quite easily.

We're into a new month now ... summer is starting to wane as September gets closer.  I suppose I should review my stitching goals from July and share with you what I hope to get done in August.

July Goal Review

Work on Enchantment of Winter - for sure!
Work on The Accolade - a wee bit
Stitch 1 Ornament - I stitched three!
Stitch 1 Quilt Block - I stitched two!

August Stitching Goals


Work on Enchantment of Winter -- In an ideal world I'd like to finish the over one section
Work on The Accolade
Stitch 1 Ornament
Stitch 1 Quilt Block -- I'd like to get two done

Over the last few days when I've not felt like working no the over one section of Enchantment of Winter I've been stitching up some freebies I came across that I really liked, that and the colour combination piqued my interest!  Someone had shared a link to Kincavel Krosses on their blog when they stitched up one of her freebies, and the below two caught my eye when I went to take a look.

After a dig through my overdyed flosses I found just the right shades for the freebies since floss brands/colours weren't specified.  Which was fun, isn't stash diving always fun???  Its a great way to discover things you may have forgotten!

On the weekend I finished up this first freebie.

c2011 Kell Smurthwaite

Last night I finished up this second one


c2011 Kell Smurthwaite
Both stitched on : 28ct White Jazlyn
Stitched with :  Pink - Unknown handdyed cotton
     Orange - DMC 4124
                Green - GAST Spring Grass

Today's plan is to work on that last over one section on Enchantment of Winter.

Tuesday, August 02, 2011

Another Nice Day On The Lake

Monday started out nice and quiet for Todd and I, it was a Civic Holiday here in Ontario and neither of us had to go into work.  Todd made us a great breakfast (eggs, toast and homefries), and we planned to lay low since the forecast was calling for sun and about 30c.  That was until my friends Tracey and Terri called us and invited us out to Terri's trailer on White Lake.  So I dropped my stitching and off we went!

A neat old gas pump in the park where Terri keeps her trailer

Some old house boats stranded on the shores of the lake

Out on the lakeshore the temperatures were actually fantastic with the breeze off of the lake.  I of course was armed with my camera!


We started out the afternoon with one attempt at waterskiing, and that was Todd.  He got up on the first try (he had tried it once in his teens), and stayed up for quite a bit.  But the water was too rough for him to get back up and none of us was willing to give it a go.

So we headed back into shore and broke out the tube to try out tubing ... a first for Todd and I.  Tubing is a riot!  I was laughing the whole time!  I do think that between the rollercoasters and tubing I need a trip to the Chiropractor!!!

John and his son Cullen (Terri, Cullen, Tracey and I went and saw the Smurfs today and had Happy Meals afterwards)

Waiting for my first turn in the tube

 Ed, Tracey's husband, we almost managed to throw him!

 That's Tracey in the tube

Todd, not looking like he's having fun but I can assure you he did, I just didn't manage to get a picture of the big grin on his face earlier!

Yes, I have my own tackle box... don't you?

Tracey and her husband had to head out late afternoon and once we all had a go at tubing, John, Terri's husband took Todd and I out fishing.  Todd was the only one to catch anything!  I think after a week of very hot days the fish just weren't interested.

Todd with the only catch of the day

 Todd doing what he loves most.  I spend a lot of the summer off stitching with friend, Todd spends it out on the water fishing.

Tracey and her husband had to head out late afternoon and once we all had a go at tubing, John, Terri's husband took Todd and I out fishing.  Todd was the only one to catch anything!  I think after a week of very hot days the fish just weren't interested.

If you're bored of my summer adventures don't worry, I've got another stitching post coming up for you soon!

Monday, August 01, 2011

Quilt Squares Update

As you know from past posts about it I'm working on getting about 48 quilt squars stitched up with the help of my friends!  In the last little while I've gotten a few more back, and I've finished one more!

Bonnie stitched up this batch for me

 One of three stitched by Sheila

Remaining blocks stitched by Sheila

The 8th block I've compleded

So I've got a few more out to some of my good stitching friends, and few more I hope to get out soon.  As things stand at this moment before I get some more stitchers to help me out I've only got 11 more to go!